Monday, July 13, 2020

Packages for using Azure DevOps Rest Clients

Today, I am going to discuss about the ADOAdmin.AzureDevOps.Clients  which can be used to call, patch and post any of the ADO API.

ADOAdmin.AzureDevOps.Clients, as the name suggests it has been aimed for ADO admins who use the ADO api's extensively. This package has got modules for working Azure DevOps  API operations as GET,PATCH and POST. This can be further extended, based on the suggestions.

This package gives facility to avoid the repetition of codes that is being used for API calls.

How to Install it?

1. Click on "Manage Nuget Package" for your solution/project
2. Search for "ADOAdmin.AzureDevOps.Clients"
3. Install it.


How to use it?

1.Once you install it, in namespace as

using ADOAdmin.AzureDevOps.Clients;

2.Once you add it in the package list, create an object for RestAPIClients:

 RestAPIClient adoClient = new RestAPIClient();       

3. To use it for GET operations:

string _jResponse=adoClient.AzureDevOpsGet(string devOpsPat, string apiUrl)

Sample:

string auditRepsonse = adoClient.AzureDevOpsGet(adoPat, adoApiUrl = string.Format(
             @"https://auditservice.dev.azure.com/{0}/_apis/audit/auditlog?startTime={1}&endTime={2}&continuationToken={3}&batchSize=1000&skipAggregation=true&api-version=5.1-preview.1",
               accountName, auditReadStartTime, auditReadEnddate, continuationToken));

4.To use it for POST operations:

string _jResponse=adoClient.AzureDevOpsPost(string devOpsPat, string apiUrl, string jsonData)

5.To use it for PATCH operations:

string _jResponse=adoClient.AzureDevOpsPost(string devOpsPat, string apiUrl, string jsonData)

Without much complications and googling for how you can use httpclients to call ADO API's use can directly use these packages.

The source code for these packages can be found here: Ado_api_Usage

Hope this helps!!!


Sunday, May 17, 2020

Manage Azure DevOps License


In this blog, I am going to explain how we can manage the licenses in Azure DevOps in a better way.

We have different type of licenses that are being provided by Microsoft to access Azure DevOps at different price levels and privileges.


Most widely used licenses to access the ADO are Basic and Basic+Test Plan which costs to $5 and $52 user/month. Allocation of these licenses are pretty easy and can be done seamlessly. But the monitoring of these licenses, whether the people are using these licenses appropriately is very difficult. At times we might have allocated some folks Basic+Test Plans license and he might have moved to some other project with another tool, but still exists in ADO without accessing ADO and wasting the license. Especially during these times when companies are planning about cost-cutting, this document might help them.

The steps to monitor the usage of ADO by users using ADO rest API can be done as below:
1.First get the list of all users with their licenses and last Access date using the User Entitlements - List API:


Example:
  
From the response collect all the users Id, licenses and last access date:


Now check whether the user’s last access date is more than 30 or not. 30 is a random number which we decided, so that those who have not used ADO for last 30 days, we will send a warning message to use ADO or else the license will be downgraded to stakeholder one.
Now if you want to downgrade directly the license of those users who have not used the ADO from last 30 days you can use API Update user entitlements:


Once we patch and update the license, we can see in ADO UI as below:


API response:


We can execute these API’s as a scheduled job which might execute twice a month to monitor the licenses. The entire source will be uploaded to my git repository soon.

Tuesday, May 12, 2020

Create common group which can access all team projects in Azure DevOps


Depending on organizational structure and security, some of the organisations would need a common security group with atleast read access to all projects. This might be for management monitoring or for some secutiry purpose.
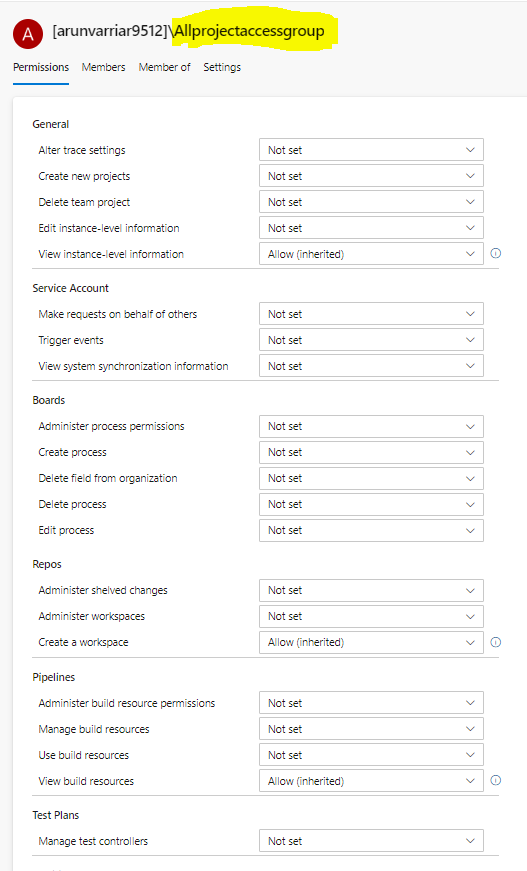
So for creating such groups, first of all you need need to collection admin of the organization. Now create a new group in Azure devops at collection level with the basic inherited permissons. Here I have created a goup with name “Allprojectaccessgroup”.


Now add people to this group who needs read permission to all the projects of your organisation.

Next step would be to create a group a group rule. For this you need to go to Users tab at organizational level.


Select add group rule and add the collection level group to it.


From the projects dropdown select the required projects in which you need to add this group. If you want add to all projects select “All”.
Once select the projects, save it. Now wait for a moment and check for the group rule being listed under the group rule tab. Select “Manage group rule” from the menu options. 


While managing group rule you can assign to required group and assign the access level:


You can select for all the projects as “Project Readers” and save it.

If we go inside projects “Readers” security group, we would be able to see this collection group being added to the project.


From here on for all the projects we create, we have to either go manually select from manage rules at group rule level or we can do some automation to update the group rule. The easiest way would be creating automated scripts using API’s to update the group rule. We can automate this using some scheduling approach. We have scheduled our script to execute once every day, so that any project created will have the new group added on the same day. I will put the code soon in my github repository.

Hope this works for you!

Thursday, April 2, 2020

Azure DevOps : Creation of custom security groups using ADO Rest API


Depending on organizational structure and security requirements, there can be a need for custom security group(s) at the project level. For example, a project level group that has access only to repos. Now this can be a standard requirement as well, where all projects getting created in the org should have this custom security group created as part of it – this post will focus on explaining how custom security groups can be created using Azure DevOps rest apis.

If you are looking to create a custom security group in all your projects,(existing and the ones getting created) please take a look at this public git repository. This repository consists of an azure function, the way which we used to automate the creation of custom security group. The azure function which  runs daily to check for new projects and created the security group.

Pre-requisites:
  1.       Collection admin privileges on Azure DevOps org.
  2.       Knowledge on ADO Rest APIs and Access Control Entries.

Create the security group

         Create the security group using the ADO rest API.
For this we need:
Ø  the project id and
Ø  the scope descriptor.
To get the project id use the Projects – List API:


Response:


Once you get the project id, use it to find the scope descriptor using Descriptors - Get:


Example: From the above response my project id is 123456789. Use this as storage key:


Response:


Here storageKey refers to the project Id.

Once you get the descriptor create the security group in the project using Groups - Create, by providing the group name and group description in the request body.


Use the below json as body for post:


Response:


Here display name is the group name, I have given it as “MyGroup” - once you post this you will find a new group getting  created in this project.


The group being created will have the below permissions:


Make sure that view project-level information is enabled. Else you will have to follow the below same steps to enable the “view project-level information”. Here for me view project -level information is enabled. So below I am going to explain how you can enable the view for repos for this group.

Assign permissions to the newly created security group

Once you create the group you need to set the permissions for this group. For this we should get the list of Namespace IDs, with Security Namespaces – Query :


You will find around 50 plus namespaces with its key permission and bit value as shown below. For example, if you take repo level namespace, it may look like as shown below. Here the namespace id for repo level permissions is 2e9eb7ed-3c0a-47d4-87c1-0ffdd275fd87. In order to set the permissions for the group, we should identify:
  • the correct namespace
  • the actions to allow/deny


Now here we must understand that the permissions/ Access control entries in ADO are controlled by its bit value. For example at repo level if you want to give only Generic Read permission then the “allow” bit value for ACE should be 2 and if you want to give Both Generic read and contribute permission then we have to take sum of both the bits i.e. 2+4=6. In case you need to deny permissions, add up the “deny” bit values for the namespace. Once you get the required, set the group’s permissions using  Access Control Entries - Set Access Control Entries:


Here one tricky thing could be that, we may have to decode the base descriptor using base64.We get the base descriptor in create group step.

Separate the descriptor from vssgp and decode it. Once decoded use this to append with descriptor using in namespace update/ACE update. Here Uy0xLTktMTU1MTM3NDI0NS0zNzMyNDgwMzkxLTIwOTQzODAzNTQtMjkwMjExNjYwMy00NzQwMjk2OTAtMS0zNzI1Njg1NDI4LTI5ODA4NTQ4NTgtMjE3MjE5MTIzNS0zMzMzODgxMDg4, can be decoded to S-1-9-1551374245-3732480391-2094380354-2902116603-474029690-1-3725685428-2980854858-2172191235-3333881088.

Important thing to note here is we need to validate that the descriptor length can be divided by 4.If its length is not divided by four then add “=” at the end of the descriptor until the length becomes divided by 4.

So, the whole body for POST request should look like below:


Now if you check the permissions at the repo level, you will be able to see that both GenericContribute and GenericRead add will be enabled for MyGroup, since allow bit is 6.

GenericContribute=4 + GenericRead=2 = 6

Once POST is successful navigate to ADO repository permissions to see the access to MyGroup:


Hope this helps!


Monday, February 10, 2020

How to Use Azure KeyVault Secrets in Azure Function

In this blog I am going to explain how we can use use values saved in Azure Key Vaults can be used while building Azure Function .

First of all you need to have your Key Vault (https://docs.microsoft.com/en-us/azure-stack/user/azure-stack-key-vault-manage-portal?view=azs-1910) and an Azure Function Created(https://docs.microsoft.com/en-us/azure/azure-functions/functions-create-function-app-portal) in Azure.

Once you have your Azure function, enable the managed service identity which will add an identity in your azure AD. To do this click on Platform Features->Identity


Now change the button from "Off to On" for System Identity


Once you enable the Identity, you will get the below message:


Now go back to Key Vault. Click on the Access Policies inside Key Vault:


Now Click on "Add Access Policy":


Now on "Add Access Policy" page click on the "Select Principal"


Now on the search pop up search for your azure function, for example here my Az Function name is "MyKeyVault" function


And now from "Configure from template" provide proper access that is required.


Now click "Add". Now click on "Secrets" and "Generate/Import Secrets" to save new "Secret Values" in Key Vault:


Once you add the secret, copy the secret identifier:


Now go back to Azure function and select configuration and add a new variable:


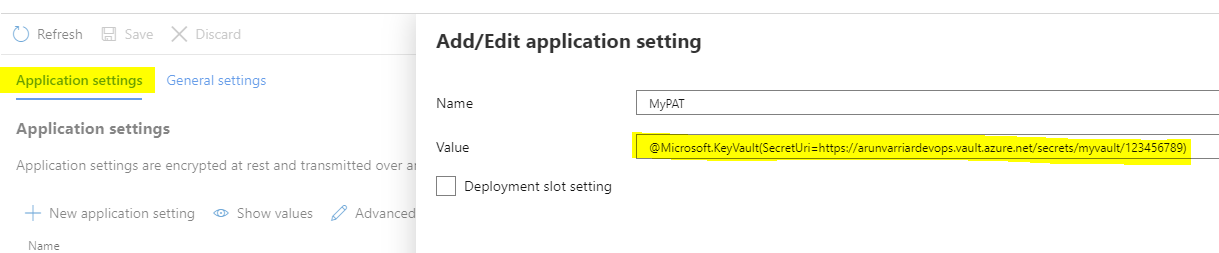
Here I am going to add a new Application Setting string "MyPat" and paste the secret identifier copied from key vault to the value text box as shown below:

@Microsoft.KeyVault(SecretUri=Secret Identifier from Key Vault)

@Microsoft.KeyVault(SecretUri=https://arunvarriardevops.vault.azure.net/secrets/myvault/123456789)


Once you add this now we can directly use these as system config values in our azure function as:

string MySecretKey= System.Environment.GetEnvironmentVariable("MyPAT");

Here System.Environment.GetEnvironmentVariable("MyPAT") will fetch the actual key vault secret and save it to the string MySecretKey.

I hope this helps.

Monday, December 16, 2019

How to use Azure DevOps API for Get,Patch, Post in ADO using C#?

In this blog, I am going to discuss about how to GET,PATCH and POST the ADO Rest API's using C#.

AzureDevOps provides rest API's as their endpoints to fetch the data,partial update(patch), or to create in ADO. We can call these API's in different programming languages. Below is how we can use it in C#

GET:

Below is a generic function which can be used as "GET" function in c#

public string getAdoapi(string pat,string link)
{
    string Url = link;
    string responseBody = "";
    using (HttpClient client = new HttpClient())
    {
        client.DefaultRequestHeaders.Accept.Add(new MediaTypeWithQualityHeaderValue("application/json"));
        client.DefaultRequestHeaders.Authorization = new AuthenticationHeaderValue("Basic", Convert.ToBase64String(
        ASCIIEncoding.ASCII.GetBytes(
        string.Format("{0}:{1}", "", pat))));
        using (HttpResponseMessage response = client.GetAsync(Url).Result)
        {
        response.EnsureSuccessStatusCode();
        responseBody = response.Content.ReadAsStringAsync().Result;
        }

    }
    return responseBody;
}


POST:

Similarly for POST, apart from API and PAT the function requres postJson i.e the JSON which is contains the data that has to be posted over to ADO.

public string postAdoapi(string pat,string link,string postJson)
{
    string Url = link;
    string responseBody = "";
    using (HttpClient client = new HttpClient())
    {
    client.DefaultRequestHeaders.Accept.Add(new MediaTypeWithQualityHeaderValue("application/json"));
    client.DefaultRequestHeaders.Authorization = new AuthenticationHeaderValue("Basic", Convert.ToBase64String(
    ASCIIEncoding.ASCII.GetBytes(
    string.Format("{0}:{1}", "", pat))));
    var method = new HttpMethod("POST");
    var request = new HttpRequestMessage(method, Url)
    {
    Content = new StringContent(postJson, Encoding.UTF8, "application/json")
    };
    using (HttpResponseMessage response = client.SendAsync(request).Result)
    {
    response.EnsureSuccessStatusCode();
    }
    }

}

Here is how you can pass JSON in c#:

 public static string postmyJSON(string xyz)
        {
            return JsonConvert.SerializeObject(new
            {
                activitytitle = "Notification from AzureDevOps",
                activitySubtitle = "BuildQueued",
                impactedarea = "http://dev.azure.com/myorg",
                description = descriptionforqueues
            });

        }

PATCH:

As you saw in POST API, we need to have patchjson needs to be passed to the function patchAdoapi. You can use the same postmyJSON for creating JSON for patch(purely depends on what kind of json you need) and also call the patch function simillar to postAdoapi: - myfunction(postmyJSON(xyz)pat)

public static void patchAdoapi(string pat, string link,string patchJson)
{
string responseBody = "";
string Url = link;
//HttpClient client = new HttpClient();
using (HttpClient client = new HttpClient())
{
    client.DefaultRequestHeaders.Accept.Add(new MediaTypeWithQualityHeaderValue("application/json-patch+json"));
    client.DefaultRequestHeaders.Authorization = new AuthenticationHeaderValue("Basic", Convert.ToBase64String(
    ASCIIEncoding.ASCII.GetBytes(
    string.Format("{0}:{1}", "", pat))));
    var method = new HttpMethod("PATCH");
    var request = new HttpRequestMessage(method, Url)
    {
        Content = new StringContent("[" + patchJson + "]", Encoding.UTF8, "application/json-patch+json")
    };
    using (HttpResponseMessage response = client.SendAsync(request).Result)
    {
        response.EnsureSuccessStatusCode();
        responseBody = response.Content.ReadAsStringAsync().Result;
    }
    //var responseMessage = await client.PatchAsync(new Uri(Url), httpContent);
    } 
}

PATCH JSON : 

 public static string patchmyJSON(string xyz)
        {
            return JsonConvert.SerializeObject(new
            {
                activitytitle = "Notification from AzureDevOps",
                activitySubtitle = "BuildQueued",
                impactedarea = "http://dev.azure.com/myorg",
                description = descriptionforqueues
            });


        }

Now you just need to call these generic functions as required:

Here link refers to the API all the below functions. For example:

objGetApi is object of the class I created.

string listofProjects = objGetApi.getAdoapi(pat,Url = string.Format(
            @"https://dev.azure.com/{0}/_apis/projects?$top=500&api-version=5.1",
        accountName));

For POST:

objPostApi.postADOapi(pat,@"https://dev.azure.com/{0}/{1}/_apis/wit/workitems/${type}api-version=5.1",accountName),postJson);

For PATCH:

objPatchApi.patchADOapi(pat, projectsUrl = string.Format(@"https://vsaex.dev.azure.com/{0}/_apis/groupentitlements/{1}?api-version=5.1-preview.1", accountName, groupId), jsonProject);

Hope this helps!!


Wednesday, November 27, 2019

How to fetch all projects from AzureDevOps and list it in Excel?

In this blog I am going explain how you can export the list of all projects of an Azure Devops organistaions to an excel for reporting purposes:

The document referred is: https://docs.microsoft.com/en-us/rest/api/azure/devops/core/projects/list?view=azure-devops-rest-5.1

Use the below power shell code and execute it:

#Enter the organisation name
$vstsaccount="Enter Organisation Name"
#Enter the API
$api="https://dev.azure.com/$($vstsaccount)/_apis/projects?`$top=200&api-version=5.1"
#Enter the user id
$user="arun.varriar@orgname.com"
#Enter a PAT which has org level access
$token="Enter org access PAT"

$base64AuthInfo=[Convert]::ToBase64String([Text.Encoding]::ASCII.GetBytes(("{0}:{1}" -f $user,$token)))
#Invoke the API
$result = Invoke-RestMethod -Uri $api -Method Get -ContentType "application/json" -Headers @{Authorization=("Basic {0}" -f $base64AuthInfo)} 

#Write the result to excel
$result | select -Expand value | ForEach {
        $_.name = $_.name -join ' '
        $_
    } | Export-Csv C:\MyFolder\list.csv -NoTypeInformation

Here in API the filter criteria we have used is $top=200, so it will list only the top 200 projects in ADO(done with an assumption that we have projects less than 200, so all the projects will be listed).

So without using the $top if you want to list all the projects you need to use Continuation Token which is going to be the heart of API calls. To get the list of all projects using ContinuationToken use the below script:

$vstsaccount=""
$projects=$null
$user=""
$token="pat"
$base64AuthInfo=[Convert]::ToBase64String([Text.Encoding]::ASCII.GetBytes(("{0}:{1}" -f $user,$token)))
$ContinuationToken=$null
$j=$true
while($j  -eq $true)
{
$projectname="https://dev.azure.com/$($vstsaccount)/_apis/projects?ContinuationToken=$ContinuationToken&api-version=5.1"
$result = Invoke-WebRequest -Uri $projectname -Method Get -ContentType "application/json" -Headers @{Authorization=("Basic {0}" -f $base64AuthInfo)} 
$continuationToken = $result.Headers.'x-ms-continuationtoken'
$projectsets =$result.Content | ConvertFrom-Json
$projects += $projectsets.value.name
$projectsets | select -Expand value | ForEach {
        $_.name = $_.name -join ' '
        $_
    } | Export-Csv C:\MyFolder\list.csv -NoTypeInformation -Append
    if($ContinuationToken -eq $null)
    {
    $j=$false
    }

}


You will have an excel with list all projects in the path specified. ENJOY!!!

How Selenium grid can be established for Protractor Solutions?

In this we are going to look into how we can use the selenium grid for parallel execution of the Protractor tests.

Using the selenium grid we can achieve parallel test execution across different browsers, OS, machines, which in turn saves a lot of our time.

The steps to follow are:

1.Download the latest Selenium Standalone Server https://selenium.dev/downloads/


2.Copy this file to a safe folder and open the command prompt.Change the working folder to the path where the selenium standalone server exists.


3.Now execute the below command:

java -jar selenium-server-standalone-3.141.59.jar -role hub


Now we can see that the selenium hub is up and running. So the nodes should connect to this ip address or machine.

Now if you want check see how many machines are connected to this hub you simply browse using the ip address: http://192.168.29.223:4444/grid/console .

4. Next step would be to establish the connection from node to grid.For this download the selenium standalone server and the browser driver to the node machine.


5.Now open the command prompt change the working folder to the path where both driver and selenium server exists.

Here I am using the same machine as hub and node. So I will open another instance of command prompt.I will change the working folder to the same path C:\SeleniumAuto

java -Dwebdriver.chrome.driver="driver path" -jar selenium-server-standalone-3.141.59.jar -role node -hub "ip adress of machine"

java -Dwebdriver.chrome.driver="C:\SeleniumAuto\chromedriver_78.exe" -jar selenium-server-standalone-3.141.59.jar -role node -hub http://192.168.29.223:4444/wd/hub

Once run the command, we can see the the node is registered:


Now if hub machine cmd, you will able to see that a node has be registered.

Now if we refresh the browser then we can see that a node has been registered:


The same steps can be 4 and 5 can be repeated for any number of nodes.

Here I have used rand ports to register the node. We can specify the ports for the nodes and hub if there any security issues. For example:

1.Node:

java -Dwebdriver.chrome.driver="C:\SeleniumAuto\chromedriver_78.exe" -jar selenium-server-standalone-3.141.59.jar -role node -hub http://192.168.29.223:4444/wd/hub -port -5555

Simillarly add  port in Hub too.

Once all the nodes are registered your grid is ready, up and running.Now you are good to run your tests.


Tuesday, November 19, 2019

How to upscale and downscale the VMSS using powershell?

Today, I am gonna discuss about how we can increase/ decrease the count of machines in a VMSS in Azure. This script can be extremely useful while using the AzureDevops pipeline for scaling the VMSS.
I have used this script for changing the count of the number of machines depending the number of test cases to executed(in automated testcases).

Below is script:

$resourceGroup = "Enter the resource group name"
$vmName = "Enter VMSS Name"

$vmss = Get-AzVmss -ResourceGroupName $resourceGroup -VMScaleSetName $vmName
#Sku capacity is number of machines that will run once this script is executed
$vmss.sku.capacity = 5

Update-AzVmss -ResourceGroupName $resourceGroup -Name $vmName -VirtualMachineScaleSet $vmss

While using the above script for automating, you may need to login to the Azure using the poweshell itself using "Connect-AzAccount":

$azureAccountName ="Client Id"
$azurePassword = ConvertTo-SecureString "client_password" -AsPlainText -Force

$psCred = New-Object System.Management.Automation.PSCredential($azureAccountName, $azurePassword)

$tenantId="Enter Tenant id"

Connect-AzAccount -ServicePrincipal -Credential $psCred -Tenant $tenantId

This can be very useful when you need to scale up or down with using the Azure DevOps pipeline. Even the script can be effectively used in Azure Devops Powershell tasks.

Thursday, November 14, 2019

How to download the contents in Azure Blob storage using Powershell?

In this blog, I am going to discuss about how we can download the files inside our blob storage using powershell. For basic understanding about blob storage, you can refer to this link:https://docs.microsoft.com/en-us/azure/storage/blobs/storage-blobs-introduction

For this you need to have azure cli installed in your machine as a prerequisite: https://docs.microsoft.com/en-us/cli/azure/install-azure-cli-windows?view=azure-cli-latest

Now in power-shell run the script as below:

#Note the Container name from storage explorer
$container_name = 'packer-test'


#Enter path where you need to download the files from blob
$destination_path = 'C:\Path'

#Copy the connection string of the storage account where blob exists:
#To get the connection string go to Storage account and check for Access Keys

# For more details on connection string, refer: https://docs.microsoft.com/en-us/azure/storage/common/storage-configure-connection-string


$connection_string = 'xxxxxxxxxxxxxxxxxxxxxxxxw==;EndpointSuffix=core.windows.net'

$storage_account = New-AzureStorageContext -ConnectionString $connection_string

# Get the blobs list
$blobs = Get-AzureStorageBlob -Container $container_name -Context $storage_account

# Just download the blob which is required. Here I, have mentioned "myfiletodownload.txt"

Get-AzureStorageBlobContent `
    -Container $container_name -Blob "myfiletodownload.txt" -Destination $destination_path `
    -Context $storage_account

Now if you check in your destination path, you will find the myfiletodownload.txt(blob content) downloaded.

Sunday, November 10, 2019

How to clone Azure DevOps Git Repo using Git Command Line(GitBash)

In this blog, I am going tell how to clone the git repos in Azure Devops to your local machine using the command line GitBash. For this as prerequisite you need to install git bash from https://git-scm.com/downloads


Once you install open the git bash:


 Now change the working folder/path to which you want to clone the repo:


Once you change the path, open Azure Devops repo. Here my repo name is: "DemoClone"


On the left side click on "clone" and copy the clone link:


Now paste the clone link in git bash using the command: "Git clone". Once you enter you may be asked for either PAT: https://docs.microsoft.com/en-us/azure/devops/organizations/accounts/use-personal-access-tokens-to-authenticate?view=azure-devops&tabs=preview-page
or login id and password.
Once completed you will get the message as shown below:


Clone is completed...Now you can work with the cloned files!!!

Now open the the folder and we will able to see that a new folder with repo name will be created over there:


Navigate inside to see the files inside the repo:


Now in the git bash change the path to inside the folder being created  while cloning - "DemoClone"


To see the history enter command: Git log


Now you are done!!